Monday, 19 April 2021

Sewing for Beginners

 Sew Easy Fabrics for Beginners

By Mayra Cecilia

Congratulations! You have already sewn some small projects and are set to move on to sewing your own garment.  Perhaps you are now getting ready to sew your first dress and looking forward to wearing your first creative sewing expression. And if you are a bit nervous that it will not turn out perfect, don’t fret. We all make mistakes but working with certain fabrics for beginners could make your first sewing project a sure success!

Fabrics for beginners

As you start to go beyond the invisible border of buying clothes and getting ready enter the wonderful world of sewing, it is important to know that there are fabrics that are more adaptable than others. Generally, one of the most manageable fabrics to work on is cotton. This versatile fabric can be as light as a handkerchief or heavy like a canvas and is the fabric of choice for shirts, skirts, trousers, jeans, and dresses.

Fabrics can either be woven or knitted. It can be also be made from animal fibres, plant fibres or man-made fibres. Since knitted fabrics stretch more than woven fabrics, this makes them harder to manage –so let’s start sewing with woven fabrics first, like moleskin and smooth corduroy, which are almost always made from cotton. These fabrics are also relatively cheap. Stay away from cotton jersey though, because it is a fabric that is knitted by machine from fine cotton threads, making it quite stretchy and not as easy to work with. Heavy-weight cotton fabrics like denim may also be a bit difficult to manipulate.  Have a look at our article on Tips for Sewing Denim if you want to have a go.

Tips for Sewing Denim: Easier Than You Think!

Try woven linen first

Woven linen is also ideal for your first garment project. It’s available in a variety of weights and is great for summer wear. Take note that linen, which is often blended with cotton, tends to crease a lot and can be a bit expensive.  Therefore, the best project for beginners using linen are tunics, sleeveless blouses and loose shirt dresses, pyjama pants.

For a fun and easy project please take a look at our super easy tunic, the perfect project to build your sewing confidence.


If you want to sew a skirt, you can also opt for woven wool for that posh look, but this fabric is expensive. Synthetic or man-made woven fabrics like polyester and polycotton are recommended as fabrics for beginners. Crease resistant and lightweight, they are cheap and manageable. Finally, cotton velvet is stable and is great for skirts and simple but glamorous jackets.

Move on to knits as your skills grow

Generally, woven fabrics like cotton, linen, and cotton-linen blend are great choices as fabrics for beginners because they do not slip or stretch that much. Stay away from knitted fabrics like shiny polyester, silk, rayon, and cotton jersey for now.  If you really want to have a go with knits, please check out our article Sewing with Stretchy Knits for some guidance.

Sewing with Stretchy Knits

Try to use light- to medium-weight fabrics too and remember that heavy fabrics with bumpy ridges are hard to manipulate. And make sure to choose fabrics with plain colours or small prints since stripes, checks and fabrics with large patterns are tricky in laying them out.  Before you venture into knits, try your hand at slippery fabrics that are easier to manipulate, at the top of your list should be challis.

Choose the pattern, then the fabric

It’s also best to buy your sewing pattern first. Choose your fabric later because patterns will help you know not only what kind of fabric you’ll need, but also how much fabric you should buy too. After choosing your fabric, you can then buy notions like buttons, thread, and zips to match.  We have a comprehensive list of The BEST Online Fabric Shops if you're looking for fabric.

If you did all these steps, you are now ready to make your first garment. And before you know it, you will be wearing your first creation. Have fun sewing!


Monday, 6 April 2020

Headbands

I've always wanted to make a bunch of headbands for myself and as gifts. Here are a few tutorials and links to patterns for three different headbands. These were sourced from online searches.

This is a great pattern for a knotted headband - for a baby 12 months or older. I'm going to adapt the pattern to fit a tween and an adult.


This is a similar type of headband with the knot on the top however, the fabric wraps around your head a couple of times and floral wire is used to to maintain any shape you desire.

                                         
The great thing about these is that there’s WIRE in them so you can create whatever shapes you want and it stays put! You have the freedom here to get creative, maybe even weave it through a side braid?! Plus, you can choose all sorts of different fabrics and do a variety of thicknesses and lengths! I’ve already made 3 :). 
Here’s how you do it:
Step 1: Gather materials needed – Floral wire, Fabric, and basic sewing tools.
Step 2: Cut a strip of fabric wide enough to fold in half (can be as thick as you want!) but make sure it’s long enough to go around your head once or twice with some extra on the ends. I liked making mine super long.
Step 3: Fold right sides together and iron flat.
Step 4: Sew together the long way. psst... you don’t need a sewing machine to do this – it just goes faster that way!
Step 5: Attach a safety pin to one side but only through one side of the fabric. Then feed the pin through the tube to turn it right-side out.
Step 6: Take your wire and bend one end into a loop.
Step 7: Feed the wire through the fabric tube.
Step 8: This part is a little tricky because you want the wire loop to stay put at the ends. Hold the wire loop at the end while sewing the fabric shut and make sure you put stitches through the wire loop too. So now the ends of the wire will stay put. Then just repeat on the other end and you are done!
Here’s me putting my hair wrap on:
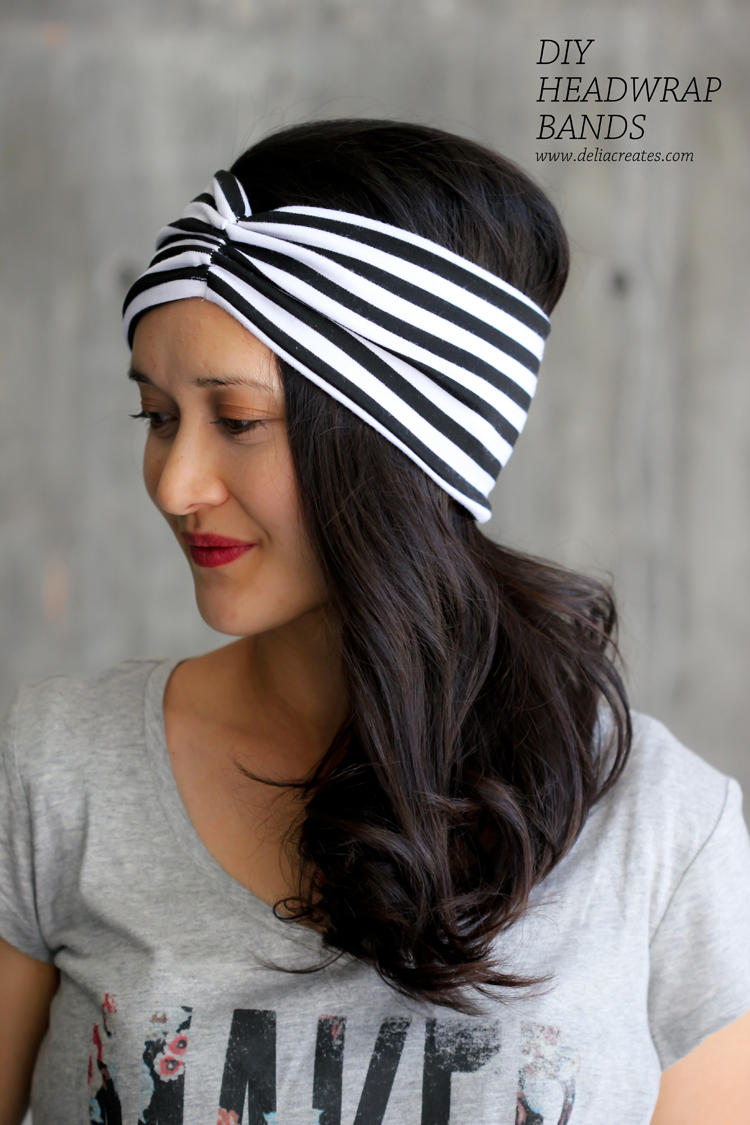
This last headband is a bulkier one, made with knit - stretchy fabric. It's important to use a jersey or ballpoint needle when using this fabric.  
Materials:
Knit Fabric*
Jersey or Ball Point needle (for sewing with knits)
Hand sewing needle
Matching thread
Basic sewing supplies (sewing machine, scissors, pins, etc.)

*You can use almost any kind of knit fabric. Light weight knit usually has more stretch to it and its edges tend to curl, so it’s a little trickier to sew, but will provide a more flexible fit.
First, measure your head.
LENGTH
Measure around your head from forehead down to the upper part of your neck and then back around.
For a mid-weight knit that is a little stretchy but bounces back easily (has good recovery), use your exact measurements. It will end up being a little bit smaller because of the seam allowances, but it will stretch to fit your head nicely. If your knit fabric is really stretchy, consider subtracting an inch from your head measurement. The fabric needs to stretch some to fit your head without falling off.
If you are making the headbands to sell or as a gift, here are general length measurements for a mid-weight knit with good recovery:
Toddler = 19″
Girls =20-21″
Women’s = 22″
WIDTH
When cutting the width, decide how wide you want it, then double it and add 3/4″ for seam allowance (3/8″ x 2).
You can cut the width of your headwrap band to your preference. If you would like the thick headwrap look, the following is a good guideline:
Toddler = 6 3/4″
Girls = 7 3/4″
Women’s = 8 3/4″
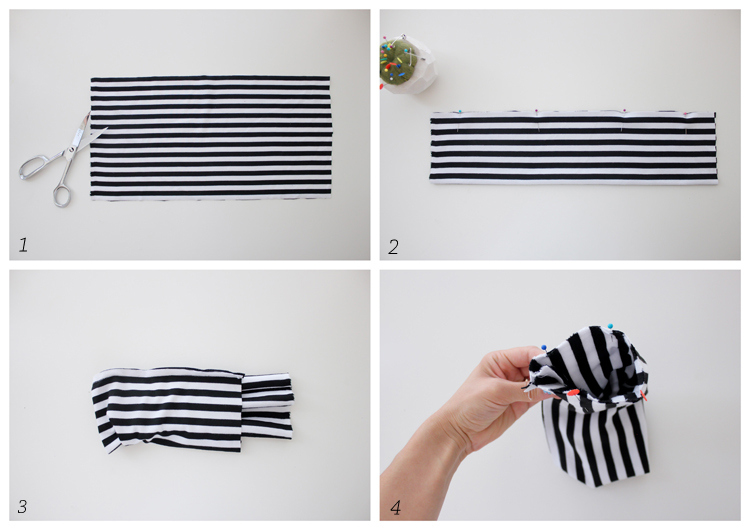
Now, let’s sew!
1. Cut fabric (see above)…
2. Fold it lengthwise and pin the long edges together with right sides facing. Sew along long edges with a stretch stitch. I used a narrow-modified zig zag stitch. A serger overlock stitch works great as well.
3. Pull out the tube of fabric, you have just sewn, halfway so that the two short ends meet with right sides still facing.
4. Make sure the seams line up (so the band won’t be twisted) and pin the short ends together. Sew around leaving a 2-inch opening unsewn. Make sure to back stitch when you start and stop sewing, so that the opening won’t rip open any further when you turn the headband right side out.
\
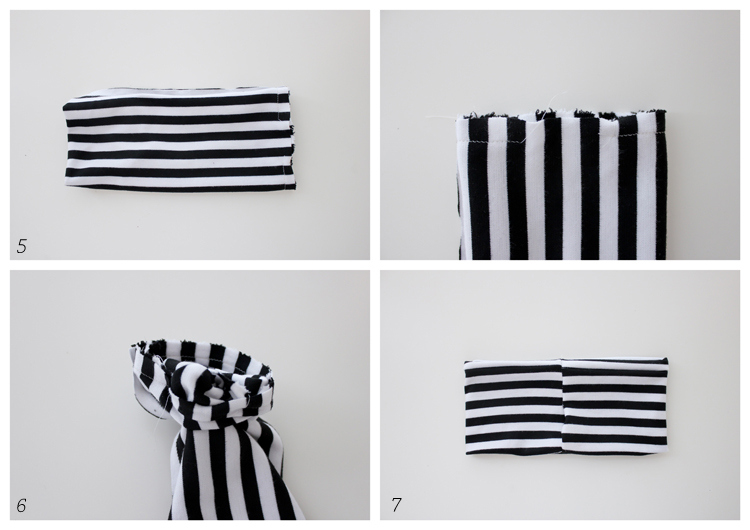
5. This is what your fabric should look like now.
6. Through the opening, pull your headwrap band right side out.
7. Now you’re ready to do some hand sewing. If your pattern/stripes don’t match up quite right, don’t sweat it! You are going to ruche right on the seam and won’t notice it at all when you’re done.

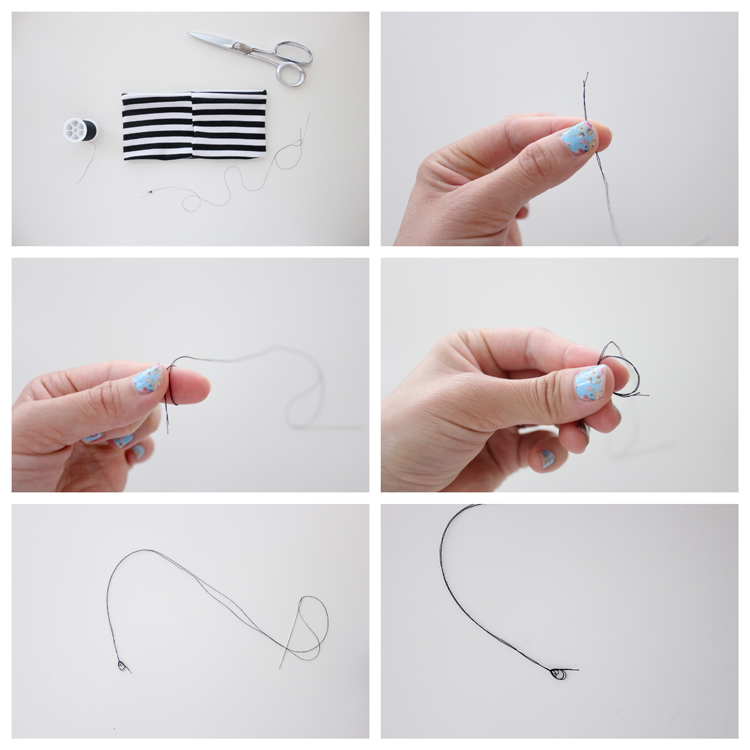
Before we get to that though, we need to thread a hand sewing needle and knot it off.
Double up your thread, wrap it around your finger, roll the loop between fingers and pull needle end tight. Ta da! A knot. It’s a messy, chunky knot, but that’s what you want.
Okay, let’s get back to sewing.
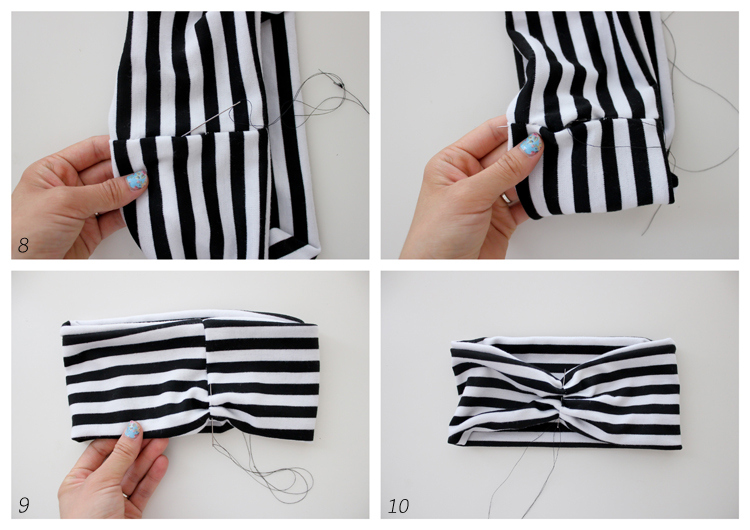
8. Insert your needle into the opening at the seam and push the needle out the side (or really bottom) of the headwrap. The knot should now be encased inside the headwrap.
9. With the needle at the bottom of the headwrap, push it up through the seam of the head wrap, weaving it in and out of all layers of the head band as you go. You also want to close up the opening as you go. To accomplish this, weave back and forth between both sides, just slightly as you weave upward.
10. When you get to the top of the headwrap, turn around and weave it back down the seam in the opposite direction. Repeat this about three or four more times, until the headwrap is securely ruched or gathered. Knot it off in a discreet spot and clip your ends.
Headwrap band done and ready to wear!
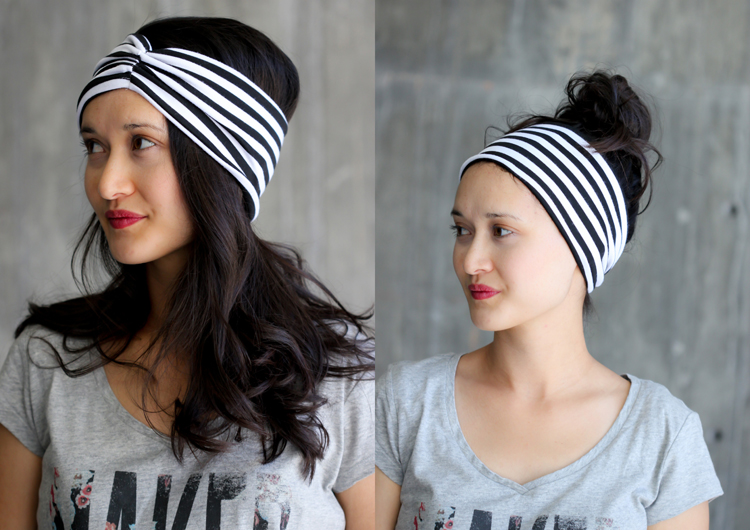
You can wear the ruching in the front or flip it to the back, so the front has a smooth look.
Friday, 27 March 2020

Making Face Masks

There are fairly simple instructions and pictures to guide you -  I will be ensuring there are three layers rather than two and have used Winceyette which is a lightweight napped flannel typically used for pyjamas. 


Here's a PDF of the pattern - print on A4 paper


Instructions
Cut out 4-6 pieces fabric using your chosen pattern size(100% Cotton is best as it is 'breathable').
After cutting, you will have two-three pairs of fabric.
Pick two pieces and align them right side to right side.
Stitch along the longest curved side 0.5cm from the edge.
Clip the curved edge to allow the seam to sit flat.  

Open the stitched piece, fold the seam to the left or right, and top stitch where the bulk of the seam is - this is a flat felled seam.
Repeat the above steps with the remaining pieces (one of the pairs can be stitched wrong side to wrong side and have an open seam when using three layers).
Place two of the completed pieces right side to right side, the third can be placed either way - I have chosen to place the pieces so that the print is what will be seen when wearing the mask and the white is the 'backing'.
Stitch along the long edges, leaving the short edges open.
Turn the fabric inside out through one of the openings on the short sides.
Top stitch along the long edges 3-5mm away from the edge.

There are a range of different ways to prepare the short edges to attach or insert the elastic. In the interest of keeping it simple, I'll explain two simple techniques.
One (this is the technique I will use).
Neaten the short edges with an overlocker or a zigzag stitch. 
Fold the short edge over 1.5cm and top stitch to secure - this creates a casing for the elastic.
Cut two pieces of elastic 15-18cm in length.
Use a safety pin to insert each piece of elastic through the 'casing' that has been created. Overlap the ends of the elastic and zigzag stitch to secure.

Two.
Fold the short edges over twice, to hide the raw edge - at least 1cm per fold.
Top stitch close to the inside fold - this should create a loop that allows you to easily thread a piece of elastic through whilst hiding the knot inside the fabric.
**Alternatively, cut the elastic to the desired length, overlap the two ends to form a loop, zigzag stitch closed, and insert before stitching the 'casing' closed.

Thursday, 23 January 2020

Making a Bandana Bib


This is a great project for beginners and a fabulous way to up-cycle - by using old linen, such as towels and sheets. I’ve made a number of these over the holidays and given these to friends as gifts. 
I created a small and a large pattern on news print following the measurements below. 
Image result for measurements for a bandana bib
Here are some that I have made using a range of scrap fabric and old towels, following the video at the bottom.


Tuesday, 12 November 2019

Soft Toy/Neck Pillow Term 4

The Year 9’s are steadily working towards completing their Upcycled Soft Toy/Neck Pillow. They have been reading and trying their best to interpret pattern instructions - which can sometimes seem like they are written in a variety of languages!

Here's an image of two that are almost completed. Keep up the good work Year 9s!!


Tuesday, 15 October 2019

Making a Scrunchie

So many of you have been asking how to make scrunchies! Here is an incredibly simple tutorial to help you out.

Wednesday, 21 August 2019

Level 3 - Pleats

There are many types of pleats, so which one do you want on your garment?
Visit this website for more information. 

Level 1 Pattern Adaptation - Garment Construction Techniques


Year 11’s are currently working on pattern adaptations to create a skirt with a bib and straps. 
There are a lot of techniques involved in the construction of their garments - watch the videos below and see how these ladies put their garments together. 
What techniques do they use?


Wednesday, 7 August 2019

Senior Textiles


Senior Textiles’ students have been working hard this year to construct garments that they are really proud of. 

Year 11's have made Pyjama Shorts with a ruffle on the hem - this is an incredibly hard technique which requires a lot of patience and perseverance to complete to a high standard. 


Year 12's have been working on construction a shirt with either a one or two piece collar, set in sleeves, and a button placket. These techniques require some practise as accuracy is the key.


Thursday, 11 July 2019

Completed Year 9 and 10 Projects


Term Two flew by really quickly! Year 10's began learning how to construct a Hooded Sweatshirt following tricky pattern instructions and some of the Year 9' began an Up-cycled Soft Toy.
Here's a glimpse at some of their completed work...


Friday, 21 June 2019

Hooded Sweatshirts, Term Two

Year 10’s are underway with the construction of their Hooded Sweatshirts!! They are doing a fabulous job supporting one another. Can't wait to show you their finished work.


Friday, 29 March 2019

Year 10 Cushions

Year 10’s have begun applying designs to their cushion fabric using the silk screens to screen print and finding fabric to stitch on applique designs. Here are two examples below....

Tuesday, 12 March 2019

Screen Printing with Paper Stencils


Screen printing with paper stencils

This video is an example of how to screen print using paper stencils and multiple layers.
Watch the video below and answer the following questions:

- Name 4 things you will need
- What is the cello-tape used for?
- What areas do you cut out first?
- What do you need to think about when attaching your stencil to the screen (frame)?
- Why were a few layers of tape used to attach the stencil?
- How should you prepare your fabric?
- What is used to add paint to the screen?
- How many passes of the squeegee should you do, what type of pressure should you apply, and how should you hold it?
- How do you lift the frame off?

Wednesday, 14 November 2018

Year 9 Neck Pillow


Check out the progress the Year 9's are making on their neck Pillows. The heads were quite challenging to construct. I'm super impressed with the work this group is achieving each week. 


Friday, 9 November 2018

C4 Availability For Seniors

The Textiles room is available for seniors as indicated by the Yellow stars. This Thursday, the 22nd, is a short day due to a PPTA meeting. Class will be available from 9:20-10:15.
On Friday I am not available until after lunch two. 


Thursday, 25 October 2018

The Zambesi Workshop


The Year 12s, 13s and I, along with Cath Steeghs, were fortunate enough to spend the morning touring the Zambesi workshop. Liz Finlay kindly showed us around and introduced us to the various staff members who talked to us about their roles at Zambesi and showed us what they were currently working on. The patterns lining the back wall dated back to the very first garments Zambesi produced - the girl's were in awe of the sheer number they had! Liz explained that due to moving to smaller premises, they have had to get rid of some of their stock and reduce a lot of the patterns to one standard size 10. 
The students checked out some stunning garments ready to be sent to various locations around NZ and Aus. Upstairs we were shown where the magic happens on a range of industrial machines. A couple of the girls gave the overlocker a go and found out just how much faster an industrial machine goes. 
Much to our surprise we were privileged enough to see the Winter 2019 range!!! Sorry, but we can't tell you what we saw! 
We then visited The Fabric Store, where the contestants from Project Runway NZ shop. We actually met Jess, one of the contestants.

Thanks again to the lovely staff at Zambesi for having us! 


Thursday, 18 October 2018

Year 10 Hoodies

The year 10’s are currently busy tracing a Hoodie pattern of their very own. Next week they're onto seam samples and practising how to construct a decent looking button hole the old fashioned way!


Monday, 1 October 2018

Year 9 Tote Bags


This is the first time around the Year 9's have made a tote bag with applied designs. 
They researched current tote bag designs for inspiration and came up with concepts of their own. Their final design came after development - deciding on their applied designs and where they would best be placed.
Below are a few images of some completed tote bags


Monday, 24 September 2018

Level Two External

AS91359 - Demonstrating understanding of material evaluation (external)
In this assessment you are required to test various fabrics to determine the most suitable one for your jacket. For each test (choose three), you will need to have an aim, hypothesis, method, and a conclusion. Here are some tips...
AimThe aim of an experiment is the objective. In other words, it says what can be learned from the experiment. ... The aim should be brief - one or two lines.
Hypothesis
A statement--a prediction that can be tested or an educated guess. In a hypothesis statement, students make a prediction about what they think will happen or is happening in their experiment. 
Method
Discuss the steps you are following for each test - be specific
Conclusion - Discussing the Experiment and Hypothesis
  1. Introduce the experiment in your conclusion. ...
  2. Restate your procedures. ...
  3. Describe what you discovered briefly. ...
  4. Comment on whether or not your hypothesis is supported. ...
  5. Link your results to your hypothesis


Thursday, 30 August 2018

Suitable Summer Fabrics

Here are some suitable summer fabrics to keep you cool!
breathable summer fabrics

1. COTTON

Where to Wear it? 
Cotton is perfect for all climates, which is why it’s widely worn & loved. Wear this in dry heat or humidity, too.
What’s The Benefit?
This natural fiber allows air to circulate & move freely through the fabric, which makes heat more bearable. It’s like a built-in air-conditioner for your body!
Stylist Tip: Remember, cotton can shrink in the dryer! In the summer, take the extra minute to hang dry your cotton garments (it’s hot anyways!).

breathable summer fabrics

2. CHAMBRAY

Where to Wear It? 
Because this is cotton, it too will keep you cool in dry heat & humidity.
What’s The Benefit?
Chambray often comes in a higher thread count, which means it’s a finer weave & more breathable fabric.
Stylist Tip: Chambray has a similar look to denim so you can get the look without feeling weighed down.

breathable summer fabrics

3. RAYON

Where to Wear It? 
Rayon is best in dry heat. Since it’s still not a natural fiber, it won’t wick away moisture as well as cotton.
What’s The Benefit?
Rayon is a thinner thread than cotton, so it’s great for delicate, lightweight clothing that drapes ever so well.
Stylist Tip: Light-colored garments in white, cream & pastels don’t absorb sunlight like dark colors do. Wear them to stay cool.

breathable summer fabrics

4. LINEN

Where to Wear It? 
Anywhere! Linen was made for the heat.
What’s The Benefit?
Linen textiles are some of the oldest in the world—people have been wearing it for centuries, and for good reason. The natural fiber and light weave allow for maximum breathability; the coolest of the cool.
Stylist Tip: Wrinkles are part of the carefree, lived-in beauty of linen. Hate to iron? Lightly spray your garment with a water bottle and smooth over wrinkles with your hand.

breathable summer fabrics

5. BLENDS

Where to Wear It? 
Synthetic fabrics are known for detracting moisture (think: athletic wear), so they’re great in humid climates.
What’s The Benefit?
Blended fabrics keep their shape & require little to no maintenance (like ironing!).
Stylist tip: Blended fabrics resist heat well, so you can wash and dry garments without worrying about damage or dreaded shrinkage. Machine washable = huge time-saver!
Information sourced from: https://blog.stitchfix.com/fashion-tips/guide-breathable-summer-fabrics/