Tuesday, 28 March 2017

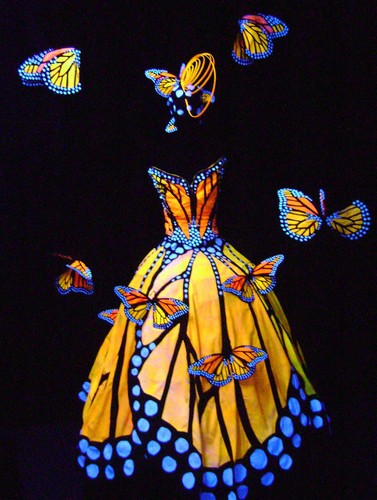
Tokoroa High School Wearable Arts Show 2017

Image result for Wearable arts  Image result for Wearable arts  Image result for Wearable arts


·         Please complete the entry form online.  You can find the entry form on the link above.
·      Entry and fee of $10.00 per wearable art must be received no later than 24 July 2017. No late entries will be accepted.
·         Fees can be paid electronically at BNZ 020464002635600 with the student entry name as reference or at the school office.

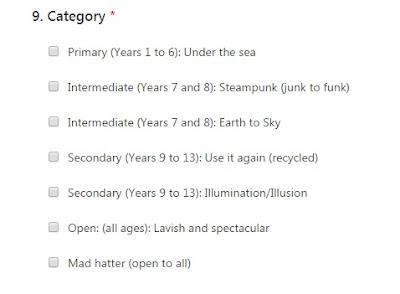
Here's an example of what to expect on the entry form:


Tokoroa High School Wearable Arts Show 2017

   Please read the conditions of entry carefully before creating your garment.
·         New rule - Each contestant can only wear one garment. If a contestant chooses to enter in more than one category, then each garment must be worn by a different model.
·         Garments must be safe to wear.  No sharp edges or items that could cause bodily harm to models, designers, or back stage staff are permitted.  This is an obvious safety precaution. Creations must be able to be clothes at least three times and need to be constructed so they can be taken on and off without too much difficulty.
·         You should supply your own models for all entries.
·         The garments must be completed and available by the date of rehearsal which will be held on 4 August 2017 at the Tokoroa Sports and Events centre. 
·         Rehearsals will begin at 10am so contestants will need to be at the centre by 9am to be fully dressed for rehearsal and meeting with the judges.
·         Contestants in the first half of the programme will have their photos done and meet the judges first while the contestants in the second half of the programme will be at rehearsal on the stage. After lunch, the order will be reversed.
·         Only the student entrants and their models will be allowed with the judges.  No parents/caregivers will be permitted with judging.
·         A pack with final details about the programme will be available to all contestants once the registrations have closed and the programme decided on.
·         You cannot enter the same wearable art into more than one category.  Each entry has a non-refundable entry fee.
·         Creations Size – Measurements no more than 2m wide or 3m high.
·         This is a community event attracting a large audience.  Standards acceptable in the general community will be upheld.  The organiser reserves the right to refuse any entrant to take part in any or all aspects of the event if the organiser determines, at their discretion, that the entrant, model or garment is not suitable.
·         Prizes are not transferable. The organisers reserve the right, at their discretion, to use the winners’ name, address, and photographs of the garments, models and/or designers for promotional purposes.
·         Judges’ decision is final and no correspondence will be entered into.  In a dispute over which category and entry will be judged in, the organising committee’s decision is final.
·         Student entrants will remain the responsibility of their parent/caregiver at all times during the event and in the lead-up to the event.
·         Completed creations (including accessory parts) must be able to be carried, pushed, and supported by the model alone.  No parents/caregivers or helpers are permitted back stage.
·         The winner for Mad Hatter is a stand-alone prize winner, which means the winner of this section will not be among the finalists for the supreme award.
·         The Mad Hatter and Lavish and Spectacular sections are open to all age groups.
·         The supreme award winner will be selected from the overall winners.
·         Disclosure is necessary if the creation has entered another competition.
·         All Rules and Conditions are subject to change at the discretion of Tokoroa High School, but will be communicated well before the event should such an amendment occur.


Tokoroa High School Wearable Arts show 2017

Screen Printing with Paper Stencils


Screen printing with paper stencils

This video is an example of how to screen print using paper stencils and multiple layers.
Watch the video below and answer the following questions:

- Name 4 things you will need
- What is the cello-tape used for?
- What areas do you cut out first?
- What do you need to think about when attaching your stencil to the screen (frame)?
- Why were a few layers of tape used to attach the stencil?
- How should you prepare your fabric?
- What is used to add paint to the screen?
- How many passes of the squeegee should you do, what type of pressure should you apply, and how should you hold it?
- How do you lift the frame off?


Thursday, 23 March 2017

Positive and Negative Space when Creating Stencils

Your task is to create a paper stencil to be screen printed on your drawstring bag. Your stencil should be inspired from the images on your All About Me Storyboard. Have you found an image online that you like, or are you going to create one yourself? You'll need to think about the positive and negative space. Here's a tutorial to explain what positive and negative space on a stencil means...

- What does positive space mean?
- What is a continuous shape?
- What is negative space?


Your task now...
Draw a range of designs/pictures that relate to your All about me Storyboard. Annotate/Explain each design and its significance to you. 
One of these will become the stencil we will use to screen print on your Drawstring bag!!

Sustainable Fabric - Combining Art, Design, and Living Potential

Check out the video below and how ideas take seed and come to fruition. An idea for sustainable fabric that has the potential to impact future fabric production.


Monday, 20 March 2017

Durability and the Martindale Test

Durability
The ability of a fabric to resist wear is an essential aspect of its performance

What is a Martindale dale test?
The Martindale test is a measure of the durability of a fabric. The tests are undertaken on upholstery fabrics to check their suitability for various uses – i.e. decorative chairs, heavy-traffic areas or commercial furniture. The test is also known as the ‘rub test’, and tests for abrasion resistance.

How does the test work?
The fabric being tested is pulled taut and loaded onto the lower plates of the Martindale machine. Small discs of worsted wool or wire mesh (the abradant) are continually rubbed against the test fabrics in a Lissajous figure – a wandering, oscillating circle. The fabric is continuously inspected for wear and tear and the test ends when two yarns break or when there are noticeable changes in appearance 
Click here to see an example of the machine at work.
Charles Parsons Interiors Martindale test machine
Pictured above: Martindale machine in the Charles Parsons ISO laboratory in Sydney

Extra information:
How do I read a Martindale test result?
Test results are given as a score of 1000’s of rubs or cycles, and the higher the number is, the more suitable the fabric is for heavier useage.  Fabrics are categorised depending on their test results.
Charles Parsons Interiors categorises upholstery useage as follows:
Decorative (less than 10,000 rubs).
Recommended for decorative purposes (i.e. cushions and accents).  Not recommended for general use.
Light Domestic (10,000 to 15,000 rubs).
Recommended for use on furniture that will only receive occasional use. This is due either to the use of delicate yarns in the composition of the fabric or due to the delicate construction of the fabric itself. Some decorative fabrics may not be suitable for use on heavy wear areas or fixed upholstery areas due to “dry clean only” cleaning being required, and this is not possible other than where the fabric can be removed and taken to a dry cleaner. 

Information sourced from here 

Thursday, 16 March 2017

What is Applique?


Image result for Applique with a zigzag stitch

Image result for Applique with a zigzag stitch

  1. What is applique?
  2. - Applique is ornamental needlework in which pieces of fabric are sewn or stuck on to a larger piece to form a picture or pattern. 
  3. - You decorate a garment or object made from fabric, with pieces of fabric to form pictures or patterns.
  4. - Attaching a motif.

Here's a video that is going to help us understand three different techniques used to applique. Go to 11.55 for an example of the zigzag stitch that we will be using 


Sunday, 12 March 2017

How to Tell the Difference Between Woven and Knit Fabric

When you think of woven fabrics, think of fabric you’d use to make a quilt or curtains or upholstery. Woven fabric is generally crisp and not stretchy*. It can be as thin as chiffon or as thick as denim.
*Some woven fabrics, like stretch denim or stretch poplin, have spandex woven in to give it some stretch. A stretch poplin may have 15% stretch across the grain, which means a 10″ piece of fabric can stretch up to 11.5″.
When you think of knit fabrics, think of t-shirts and leggings. Knit fabric is usually stretchy and supple. It can be as thin as mesh or as thick as sweatshirt fleece.
Knit fabrics tend to offer a superior amount of stretch compared with woven, perhaps 30-50% for a t-shirt or up to 100% for something like a nylon spandex. 50% stretch would mean a 10″ piece of fabric can stretch up to 15″. 100% would mean a 10″ piece of fabric could stretch up to 20″. That’s quite a difference from the 11.5″ from the stretch poplin example.
This handy little drawing (courtesy of Threads magazine) is a close-up of how woven fabric is constructed. Notice it’s a sort of basket-weave pattern, with the threads running perpendicular to each other. Each thread is separate from the next, meaning that when it’s cut, the edges fray.
This is a close up of a knit fabric. Knit fabric is called knit fabric because it is literally knit- very similar to the way you would knit a sweater with a ball of yarn and knitting needles. It’s just usually done on a much smaller scale: tiny needles, a very thin “yarn”. Knit fabric is all one continuous piece of thread (or close to it), so a raw edge usually won’t unravel the way it would on a woven fabric. And all of those interlocking loops are what allows for the natural stretchiness.

HOW TO TELL THE DIFFERENCE

What if the fibers are so tiny that you can’t tell if they’re crossed or looped? One way to find out if it’s knit or woven is to test how it stretches.
Because knit fabric is made from one continuous thread (much like the one continuous yarn in your handknitting), it stretches all over. Woven fabrics, on the other hand, will only stretch diagonally or as a sewer might say, on the bias.
Grab the fabric in question and pull it gently from side to side, top to bottom, diagonally. Does it stretch easily in all directions? If so, it’s probably a knit fabric. If you can only get a bit of stretch diagonally, it’s probably a woven fabric.

Efficiency, Accuracy, and Independence


Taking part in NCEA Textiles requires a certain amount of efficiency, accuracy, and independence. 

The definition of Efficiency is: The state or quality of being efficient; an action designed to achieve efficiency.


The questions in your first assignment are designed to make you think about your self-management when it comes to getting the most out of your fabric and the materials required to complete the set task. Along with the efficiency with the required resources, is efficiency with your time. To be completely efficient with your time means that you are dedicated to the task and utilising your time in class wisely. 

The definition of Accuracy is: The quality or state of being correct or precise; the degree to which the result of a measurement, calculation, or specification conforms to the correct value or a standard.

Accuracy when making your shorts requires you to do your best when following correct procedures to produce a quality garment. Again, this is includes self-management because your finished garment should be of high quality and fit for purpose.

The definition of Independence: Not relying on another or others for support; possessing a competency.

You are required to independently sew a pair of summer PJ shorts for your first assignment. By now, you should have the ability to thread a machine and find solutions to basic problems with the sewing machines. An excellence in your first assignment can be achieved by problem solving and working to the best of your ability with a small amount of support from me. 


Tuesday, 7 March 2017

Drawstring Bag

The next step in Year 9 Textiles is designing and constructing a drawstring bag. Designing a drawstring bag requires some research, planning, and concept development. You can find the brief and specifications below.


BRIEF
Students at Fairfield College are getting sick of carrying their sports shoes around in their backpack. On many occasions, student’s books are getting dirty, their lunch is getting squashed, and their bag’s smell! As a designer, you are required to design a drawstring bag that will fit a pair of sports shoes. It needs to reflect your individual style.

Specifications
·         It must have a pocket
·         Have at least 1 stencil design
·         Have at least 1 applique


Have you used PowerPoint before? Now's a great time to learn! You will be creating storyboards to show research about drawstring bags and the things that are quintessentially you!


Using PowerPoint to create a Storyboard
1.   Open up Microsoft PowerPoint
2. Save your PowerPoint to My Documents as: Drawstring Bag’s Storyboard (this will also be your title).
3. Be creative and make your title colourful/bold/a different shape.
4. Open up Chrome to begin your research of Drawstring Bag Images.
5. Save at least 8 images to the desktop (you could also take screen shots).
6. Insert these images into PowerPoint, making them look effective by using different shapes/borders/sizes.
7. Make sure you save as you go!
8. Print off in colour when complete.
9. Stick this into your Textiles book.

Things to consider when researching Drawstring Bags:
-     A range of colours and sizes
-     Prints/patterns
-     Different fabrics
-     Embellishments (tassels/frills/pockets/buttons/zips etc.)
Look for Drawstring bags that stand out, ones you really like the look of. You can have more than 8 pictures, but you need to be able to see them all when placed on the PowerPoint.

Now you are required to create a new PowerPoint slide that is all about you. What colours do you like?  Do you have a favourite sport? Is there a particular brand that you like to wear? Save images or take screen shots to add to your All about Me storyboard.

Monday, 6 March 2017

Performance Properties of Garments


Performance Properties/Aspects
A garment's performance aspects determine the standards it meets and how the consumer benefits through it. Performance aspects include the garment aesthetic and functional performance. Aesthetic performance refers to attractiveness. Do the design, material, and construction of the garment fulfill the appearance expectations? Do the elements of the garment reflect good design principles? Does the garment possess classic or current fashion trends desired by consumers? And does its appearance fulfill the wearer’s emotional needs, such as wanting to impress or be accepted by others? These questions are important to ask while evaluating ready to wear garments because design impacts the visual appeal of clothing and therefore consumer’s acceptance of it.

Functional performance includes performance aspects other than appearance, namely the garments utility and durability. Utility refers to the usefulness. For example, does the shirt fit? Does it function properly for intended use? Durability or serviceability refers to how well the garment retains its structure and appearance after wear and care. Does it resist shrinkage? Does the seam remain intact? 


Aesthetic and functional performance occasionally overlaps. For example, fit may be an aesthetic feature (i.e. attractive fit versus unattractive fit) or it might also be a functional feature (i.e. comfortable fit versus uncomfortable fit) (Brown, 1998).

Information sourced from here

Friday, 3 March 2017

Monday, 27 February 2017

The Great CanTeen Bandanna Challenge

Competitions

Take up the challenge and extend yourself, you never know until you try!!


Here's your chance to showcase your knowledge and talent in a public arena. On this page you will find details of competitions as they pop up throughout the year. Read through the information to check what the competition entails and then come and have a chat with me (Miss Jacobs) to see what kind of support I can offer. Remember that these will be done in your own time however, I'm happy to accommodate you in any way I can. 

Sunday, 26 February 2017

Year 9 Stitch Samples

Year 9's are required to demonstrate their ability to use their knowledge of how to thread the sewing machine correctly and use their developing control to create 4 basic stitch samples.


Types of Needles


The three main types of needles used on a domestic machine:

- Universal needles have a slightly rounded tip, and this general purpose needle should be used on woven fabrics as well as some sturdy knits.

- Jersey needles have a medium ballpoint tip designed especially for knit fabrics because it slips between the fabric fibers and does not break or damage them while sewing.

- Stretch needles, often confused with Jersey needles, are also a medium ballpoint tip, but these have a special eye and scarf that are designed for extremely stretchy fabrics and elastics. Swimwear is an ideal application for this typw of needle.

Parts of a Sewing Machine Needle - Domestic Machines


THE DIFFERENT PARTS OF A SEWING MACHINE NEEDLE.

  • The shank is the part of the needle that fits into your sewing machine, with the flat side to the back.
  • The blade is what determines the needle size. (For example, a size 75 needle has a blade that is .75 mm in diameter.)
  • The shaft is the “body” of the needle, and the groove that runs the length of the shaft holds the needle thread. Did you know that the diameter of the thread you are using should take up no more than 40% of the groove?
  • The point and tip of the needle refer to the size, shape and length — all of which vary based on the type of needle.
  • The scarf of the needle is an indentation on the backside that allows the bobbin hook to smoothly grab the thread under the sewing machine throat plate to create a proper stitch.

Tuesday, 21 February 2017

Describing Attributes

Physical and Functional Elements - The Nature of Technology

Physical and Functional Elements (Attributes)

Design elements provide another useful tool for analysing and interpreting an existing technological outcome.
  • Elements such as colour, movement, pattern and rhythm, proportion, balance, harmony, contrast, and style relate to the outcome’s physical nature (its “form”).
  • Elements such strength and durability, safety and stability, efficiency, reliability, nutritional value, user-friendliness, and ergonomic fit relate to the outcome’s functional nature.
By looking at these elements as a whole, the technologist can see how physical and functional elements have been prioritised to give an outcome that can be considered fit for purpose. Almost certainly they could have been prioritised differently depending on the intent of the designer, their knowledge of materials, their professional and personal beliefs, the sociocultural context, and so on.

Can you identify the physical and functional elements (attributes) that relate to Textiles?

Source: TKI.org.nz - Characteristics of technological outcomes.

The Design Process

The Design Process

1.   Situation/Need
2. Design Brief
3. Specifications
4. Investigation (survey stakeholders)
5. Research
6. Concept Design
7. Develop Ideas
8. Make Prototype
9. Evaluation

Sunday, 19 February 2017

Attaching a Sleeve

There are a few techniques when it comes to attaching a sleeve. Here's a basic technique to start you off

1. Cut out sleeves and front/back pieces.
2. Sew shoulder seams together, press and overlock.
3. Lay front and back piece flat, right side up.
4. Pin sleeve at shoulder point of front and back, matching the notches, right side to right side (if the sleeve overlaps there is too much ease and you will need to use a 5mm gathering stitch to fit ease into armhole)
5. From the shoulder point, pin all the way to one side seam, matching the notches as you go.
6. Repeat for other side.
7. Stitch with a 1cm seam allowance from side seam to side seam.
8. Press the seam towards the sleeve and overlock
9. Overlock the hem of the sleeve, turn up 1.5 cm and press (wrong side to wrong side).
11. Stitch 1.5 cm hem.
12. Fold sleeve right side to right side, matching the sleeve hem, under arm, and side seams to hem of shirt front/back.
13. Stitch 1 cm seam allowance.
14. Press open (for a nice finish) and then press to one side, overlock (seams are generally pressed towards the center back).

                   Step 3

                   Step 4

                   Step 7

                   Step 9

Year 12 - Term One - Assessment One

Year 11 - Term One - Assessment One


Creating a Balloon Ball


Sewing Machine License


Thursday, 16 February 2017

Constructing a One-Piece Shirt Collar


1. Cut out an Upper and Under Collar (make sure you include the notches)
2. Cut out interfacing ( 1 piece, this should be the same as the under collar minus the seam allowance)
3. Iron on interfacing or use a glue to hold it in place (you can use a fabric pencil or chalk to mark the position of the  interfacing on the wrong side of the under collar)
4. Stitch around outside edge (leaving the neck edge open!) with a 1cm seam allowance, pivoting at the corners with the needle in
5. Trim the corner seam allowances back, make sure not to get too close to the stitching
6. Turn in the right way, and gently push the corners out
7. Press flat
8. 5mm Top stitch around outside edge
9. Your collar is now ready to attach

This website has the perfect pictures to follow!

Wednesday, 8 February 2017

Creating a Skirt Block

Once you have taken your measurements, alongside a partner, check them over with Miss J. Following the instructions below, create a small model in your book with your measurements.
Use a piece of brown card to create your own personal block. You may need to create more later in the year!

This is what your finished block will resemble before being cut out.


To create a 1/2 block, follow the instructions below (note there are no H/J/K):

Start by using a ruler to create a straight line down the center of a piece of card.
(The measurements in green are worked out using a size 12 basic block)
AG - 1/2 hip + 2cm
AC - length of skirt = 60cm
AE - waist - hip measurement
GB - 1/2 hip + 2cm 
GI - 4.25 (1/2 hip + ease (2cm) - 1/2 waist + ease (2cm) - darts (3x2cm) / 2.
e.g. Hip 92cm; Waist 66cm 
48-33.5 = 14.5 - 6 = 8.5 / 2 = 4.25
3 x Darts - 2cm (1x SF; 2x SB)
GL - Same as GI
AM - 1/3 of AI
NI - AM (same as above)
LO - 1/3 of LB
MP - 12cm length (make a dart 1cm either side of this line, both sides taper to the point P to form a V
NQ - 10cm length
OR - 10cm length
G = Waistline Seam - Lift the waist 1.25cm at the side seam with a smooth curve that tapers at darts N and O

Curve the side seam slightly from I-S and L-S

You are now ready to cut out your personalised front and back skirt block!


Tuesday, 7 February 2017

What are Notions?


Sewing notions is an umbrella term used to describe the many small accessories used in sewing. This includes objects which are stitched onto a garment or other piece of sewing work. It is also applied to the small tools used to sew. Some of the most commonly used sewing notions are thread, fasteners such as zippers, buttons, and snaps, needles and pins, and seam rippers/quick unpicks.
Fasteners such as zippers, buttons, and snaps are another common variety of sewing notions. These notions are sewn onto projects requiring a closure that is not fixed. For instance, when constructing dresses, sewers often put in a zipper closure. This zipper can be opened, allowing the wearer to easily slip the dress on, and then closed to keep it in place